How to Clearly uninstall .PKG applications
If you got tired of having an application that didn't work and if you want to unistall them clearly then follow it.
**Disclaimer** i have tested this method and it worked completely without effecting my phone except for how i wanted it to (uninstall .pkg programs) but follow this procedure at your own risk, i am in no way responsible if you mess up your phone.
Suggested Programs:
Notepad++ (freeware) gr8 for coding, makes your life a whole lot easier, if you use notepad you will be searching for the right spot for a while, so not needed but strongly suggested, get it here http://notepad-plus.sourceforge.net/uk/site.htm
thats it for suggested programs
Total time: under 1 minute to 10 minutes depending on how many files you want to delete.
Steps.
1. Plug in your e6 in mass storage mode.
2. if you do not have "view hidden folders" enabled on windows then follow next step, if you do have view hidden folders enabled then skip step 3.
3. open up my computer, click on tools>folder options>view> click show hidden files and folders.
4. open up your phone root folder
5. go to system>QTDownLoad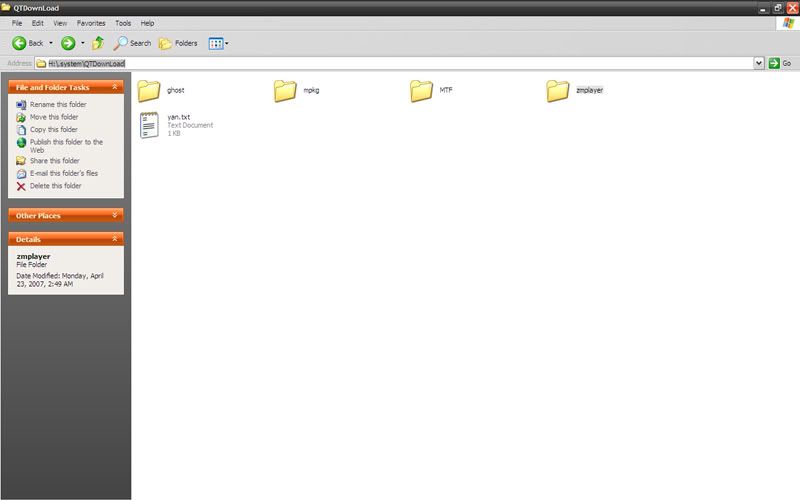
6. delete the folder of the application you want to delete
7. go to the phone root folder
8. go to system>java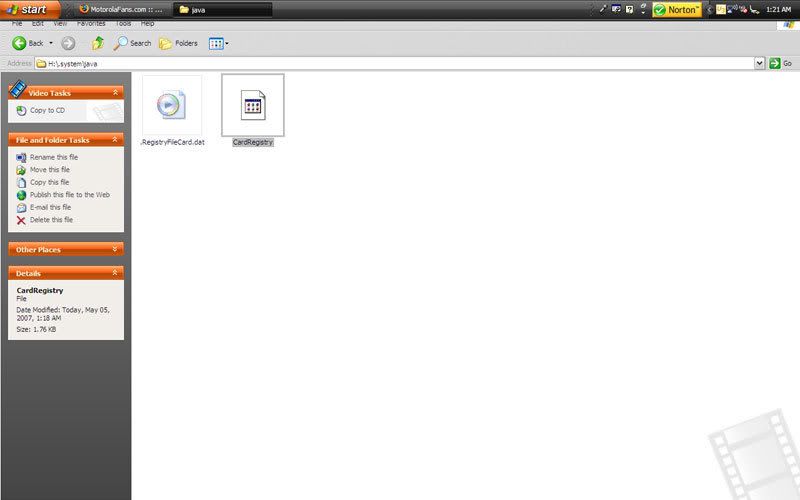
9. Open "CardRegistry" with notepad++ (or notepad)
10. scroll down in the notepad file until you find the name of the program that you want to delete, it will look something like the picture. in the picture i have zmplayer selected, for the purpose of this demonstration.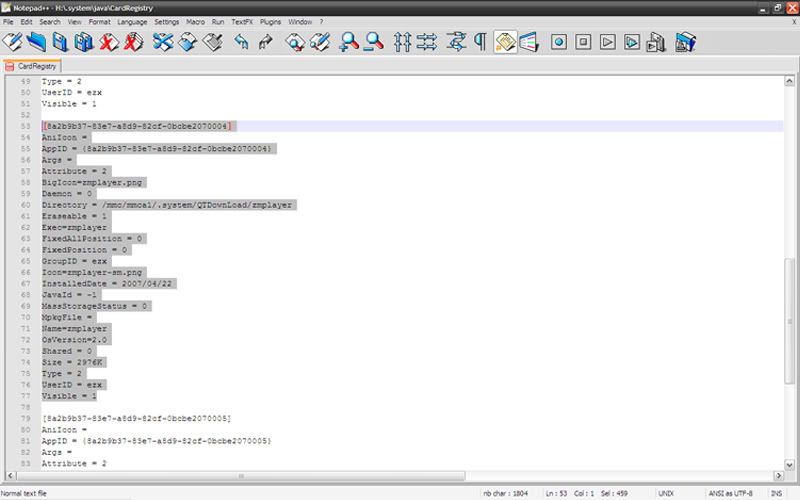
11. Select the whole block starting from the "[]" and ending with the "visible="
12. Delete the sleeted block
13. Rinse and repeat
14. once you have deleted everything you want to delete, save the file in its original location overwriting the original file.
15. pat yourself on the back because you are done!
16. you do not need to restart your phone, it will have already been deleted.
_________________________________________________________________
Originally Posted by elitegamer76 on motorolafans.
How to Install Softwares & Themes
Guide to Modding your E6
This write-up explains how to perform most of the main modifications that forum members like to make to their E6's.
It is easy-to-follow steps that new users can print off and have all the information that they need in one place to (hopefully) easily and successfully perform the mod. It does not attempt to describe everything you can do with this phone, but covers the following topics:
A1. What are rar files and how do I use them?
A2. How do I copy files to my phone?
B. What is MPKG and LINLoader and how do I install them?
C. How to install programs and games?
D. How to install themes and skins to change the way the screens look?
• Most of the software mentioned here can be found in the Downloads Box. If it is not there then leave a comment.
• If you do not understand something here or have any problems then email me or contact me for troubleshooting.
A. GETTING STARTED
All you need to perform any of the modifications described in this writeup are the following:
• a MotorolaE6 with a SD memory card installed in order to copy files to your phone.
• a Windows PC with at least 1 free USB port
• a Motorola USB data cable that plugs into the mini USB port on the bottom right of your phone and the USB port on your PC
• Motorola Phone Tools (MPT) installed on your PC - this is a program that should have come on the CD that came with your phone and should be used to back up the data on your phone (contacts, calendar, etc) before attempting any of these mods.
Rar Files
Most of the files uploaded on this forum are "rar" files. These are compressed files (similar to zip files) making them smaller to download. You need to install a program that can "unrar" them before you can use them. UnzipThemAll and 7-zip are two free programs that can unrar files. (Other users use Winrar though several users have reported problems installing files unrared with this program), I personally use Winrar. You can find winrar in Download Box
To use a rar file, you download it, then use the tool to unrar it before copying the uncompressed file(s) to the SD card in your phone.
How to Copy Files To/From Your Phone
- On the E6, go to Application Launcher-->Setup-->USB Mode and ensure that “Mass Storage” is selected
- Plug in the cable that connects the phone to the USB port on your PC.
- Open Windows Explorer and ensure that you have “Show hidden files and folders” turned on in Explorer (Tools-->Folder Options-->View-->Show hidden files and folders)
- You can now use Explorer to view the folders on your SD card on the phone. The SD card will probably be drive E: or F:. The root folder of this SD card shows directly under the Drive in Explorer – but its full path is /mmc/mmca1/ (i.e. if you copy something to the root you are copying it to /mmc/mmca1/).
- You should see a folder called .system under root. If you do not see it then check you have “Show hidden files” on (see 3 above). You are only able to view/edit files on the SD card – this method does not permit you to view/edit files directly on the phone (which is why you need installer programs like MPKG and linloader to install programs on your phone).
- You can now copy/cut and paste files to and from your PC to the folders on your SD card.
- Unplug the phone when done. (Before unplugging, you should always use the unplug or eject hardware facility. This will ensure integrity of the filesystem on the transflash card).
B. MPKG AND LINLOADER
Before you can install many programs on your phone you will first need to install the following 2 pieces of software that will permit you to install other software.
- MPKG - a package installer that will allow you to install executable app packages of type **.pkg (similarly to a java app installer). Once MPKG installer is installed you can copy files of type *.pkg to the root folder of your SD card, then install them by opening the File Manager application on the phone, go to the system folder, tap and hold the stylus on the *.pkg file and a small menu should pop up. Choose 'open with' and then choose the "MPKG" app. This will install the app and let you see it and run it from the phones Application Launcher
- Linloader - this is a program used to run shell scripts. Most of these scripts have the extension **.lin. Once linloader is installed these shell scripts are run by opening the File Manager application on the phone, go to the folder where you have the shell script you want to run, click and hold, choose 'open with' and then choose the "loader" app.
Get the MPKG Installer “Mpkg for E6” file from the download box with the name system folder in Softwares and do the following:
- Unrar the file. You will see it consists of a folder called .system.
- Plug in the phone, then use Windows Explorer to copy the entire old .system folder from the SD card to a safe place on your PC (so can recover if necessary). [If you can not see the .system file then you do not have “View hidden files” on].
- Copy the entire .system folder from the rar file to replace the one on your SD card.
- Unplug the phone from the PC and restart it. You should see a MPKG icon under Application Launcher on your phone.
- You NEVER run this program directly by clicking it - rather you open other files that have an extension of *.pkg by holding the stylus on those files until a small menu displays. Select “Open With” and select MPKG. You should hear a bell indicating the program has loaded.
If when you install MPKG, and then you copy a xxxx.pkg file to your phone and try to open it wiht MPKG, but get the error message "Invalid application" - then it did not install properly. Try the other install method listed below.
C. HOW TO INSTALL APPLICATIONS AND GAMES
Installing java/j2me apps
The E6 should run most j2me java midlets (=apps). These are files with *.jad or *.jar extensions. These apps are not run by the native OS (linux), but rather by a java virtual machine which Motorola customizes to restrict access to the OS, filesystem, internet connections etc. - which is why many of them can not read or write to files.
Difference between jar and jad: The jar file contains the actual code, textures, etc for the java app while the jad file is a text file which contains some additional info about the app, ie version, size etc. Some phones require you to always copy both of these files to your phone and install the app using the jad file. The A1200 can install apps by just having the *jar file - however, if an application has both (jad and jar) it is better to copy both files to your phone and install using the jad file as it may contain some information (such as directory locations) needed to make the app work correctly.
To install a jar or jad file, do the following:
1. Copy the file(s) to a folder on the SD card. The folder can be called anything (eg "My Downloads") .
2. Unplug the phone from the PC then find the file using the phone's File Manager
3. Simply click once on the jad/jar file to install it. A popup window will appear asking you whether to install the program on your phone or on the SD card and what category you want it to be listed under (Office, games, etc). You may get a popup stating that the application is an untrusted application - but if you got the file from Motorolafans then it is probably safe!
4. Once the application is installed the .jar and .jad files are automatically deleted
5. Turn the phone off and on then you should see the new program's icon under the Application Launcher.
For some apps that need to be able to read or write files to the phone or SD card, you need to change the applications permissions to get it to work correctly on the A1200. See the next section "How to Change an App's Permissions" on instructions on how to do this.
Installing pkg files
Note :The .08P firmware supports the PKG installation but the.10P Firmwares DONT support PKG Installations due to Restrictions. You May need to Flash to a suitable Firmware to Install the PKGs. To Check Your Firmware Version Go to your Dial Pad and dial: WWW008W. To make the W you need to Insert WAIT.
If the file extension is *.pkg then:
- Copy the file to the root folder of the SD card.
- Unplug the phone from the PC then find the file using the phone's File Manager
- Hold the stylus on the file until the small menu displays. Select "Open With" and choose "MPKG". You should hear a bell indicating the program has loaded.
- Turn the phone off and on and you should see the new program's icon under the Application Launcher
• If a file has the extension of *.mpkg, you should rename it to *.pkg before trying to install it.
• Once the program has been installed, the mpkg file should be deleted or moved to another folder so that you do not accidentally click on it again.
D. HOW TO CHANGE SKINS AND THEMES
1. What are Skins and Themes?
On the E6, “skin” means
• all display icons
• all GUI components like buttons, status bar, scrollbar, etc.
while “theme” means
• the poweron/poweroff animation screen (by default usually the Motorola startup)
• the wallpaper.
=======================================
How to Change Skins
Download Skins installer.pkg file and install it using MPKG installer.
Download Splash Installer.pkg file and install it using MPKG installer.
After a lot of experimentation I found that using these methods are safe.
- Download the skin you want and install, after unrar you will usually get these filesCode:
tlinux1
     tlinux1.pskn
     tlinux1.skn
     iconres.ezx
     logo file in jpg or png (optional)
     off/on gifs
4. Open it with Skin installer. It will take about a minut and If it has worked you should hear a voice saying “Installation complete”.
5. Turn the phone off
6. Turn the phone on and the skin should now be complete.
If you want to change the phone to another skin then Got o Setting--> Colors--> choose any defauls Color.
This will turn you back to original gray skin and allows you to install the next skin (which will delete the old skin). When you turn the file back on, you will notice the icons have returned to the grey default. Using this method I have successfully changed over a dozen skins.
How to Change your Phone’s Theme
Changing your theme changes the animations displayed when you start and turn off your phone. Any theme can be used with any skin (or by itself). You change the theme by running a file with the *.phm extension.
Some skin packages already have this file (eg TLINUX.phm) - but if your package does not then it is very easy to create one as it consists of only three lines (see below). You can either copy this *.phm file from another skin package or create it new. Edit it using Wordpad (not Notepad) substituting in the names of the startup and shutdown gifs that you want to use on lines 2 and 3. Put this file in the same directory as the skin package with the gifs you want to use.
Example of a *.phm file (eg TLINUX1.phm)
[THEME_CONFIG_TABLE]
PowerOnScreen = on.gif
PowerOffScreen = off.gif
- Hold the stylus on the *.phm file until the small menu appears. Select “Open with” and choose the theme installer. If it has worked you should hear a voice saying “Installation complete”.
- Restart your phone to make new theme active.
Originally Posted by Alpha43 on Motorolafans.
Download all required files from Download Box.
How To Flash Your Motorokr E6
Guide to Flashing your E6
This write-up explains:
• what is firmware and how to tell what version you have
• the advantages and disadvantages of the different firmware versions
• how to change the firmware (flash) on your phone.
It was created by combining and summarizing the information provided in the dozens of threads on this forum and then rewriting it as easy-to-follow steps that new users can print off and have all the information that they need in one place to (hopefully) easily and successfully flash their phones.
============================================== WARNINGS
Flashing your phone to a different version of firmware should be fairly straightforward, however, please read the following cautions before you start:
• Always find out what your current version of firmware is before you start (instructions below) and write it down! - so if issues then you will know what you started with.
• Make sure your battery is fully charged before beginning a flash
• Back up your contacts and files using Motorola Phone Tools before doing any flashing as flashing will delete all of these and return your phone to a “vanilla” state. Data on your SD card is not touched.
• Give yourself plenty of time to complete the flashing. Never disconnect your phone or turn off your PC until the flashing is finished or you may make it unusable (i.e. "brick" it!!). There are ways to recover using a tool called radiocom (described in the threads) - but they are fairly complex.
==========================================
1. What is Firmware
The E6 runs using a special Motorola version of the Linux operating system (MONTAVISTA Linux CONSUMER ELECTRONICS 3.1). This is known as the "firmware". There are several different versions of "firmware" that will run successfully on the E6. Think of firmware as being equivalent to different versions of the operating system (just as there is Windows 98 versus Windows 2000). Every so often Motorola releases a new version of firmware with new features and enhancements. All firmwares come with both English and Chinese languages (except for the Spanish version released in Latin America - up until now it's the only firmware that doesn't come with Chinese language).
2. What version of firmware does my phone have?
To determine what version your phone is currently running do the following:
• Go to your Dial Pad and dial: WWW008W. To make the W hit the menu button while in the dial pad, then hit insert->insert wait to make the W .
You should see something like:
R533_G_11.12.08P
BP: R533_G_11.12.08PB
PFlex: GSZMCAUT678SW016
DSP: 63343400 TECHNOLOGY
Look at the numbers at the end of the first line for the version. The version shown here is .08P.
3. China Mobile versus Generic (Unbranded) Firmware
Some of the firmware versions are generic (straight from Motorola) while others are China Mobile branded. This means that the Chinese mobile operator "China Mobile" has added their stuff to that firmware, like modified icons, wallpapers, startup and shutdown animation of their own brand. Some of the main differences are:
• Startup screen is a red China Mobile one.
• web browser is called Monternet
• additional icons for a customer service program and 'China Mobile In" (whatever that is!)
• additional icon for kodak app in Chinese (removable) and a bowling game
• No MSN
• File Explorer is called “My Favorites” which includes a bunch of MMS cards and the folders are named a bit differently. There are a lot of Chinese settings for e-mail, internet etc. Some can be removed, some cannot.
You can also tell if your phone was originally China Mobile branded if has a "CM" printed on the back of the battery cover.
4. Advantages/Disadvantages of each E6 Firmware Version
Each version of the firmware has a number of advantages and disadvantages. Unfortunately at this time there is no version that has everything - so you have to pick which best suits your needs. The main enhancements/bugs that the various versions fix are:
• Voicemail bug - in some versions a blank fax and/or a blank text message is sent to the phone every time voicemail is checked.
• Network time bug - in some versions the network time function does not report correct network time
• New Features - Such as Screen 3 and the EQ for Real Player ( read through the whole thread to see which firmware includes these features)
Firmware Versions
There are constantly new versions of firmware being released so you should check the threads for the latest. However following is a summary of the versions that were available as of April 2007 - along with their advantages and disadvantages gathered from user's posts - so you can see where you stand with your current version. [Most important versions marked by  ]
]
The Following are all Generic Firmware R533_G_11.12.02P R533_G_11.12.06P R533_G_11.12.08P
Change Log - Nothing has changed until 08p which includes an EQ for Real player & Screen 3.
MonsterPacks
There have also been a number of modified versions of the firmware (aka "monsterpacks") posted to the forum. These are usually debranded versions of ChinaMobile versions (ie the mod had removed the Chinese icons and other CM added stuff). The 4 most popular being from a talented developer in China called Bint (I believe) who posts these on a Chinese language site club.ccmove.com. These are often improved by folks such as mischka and alpha43 & Ahman and reposted to MotorolaFans: E608P_Hybrid_ahman_v1 ( Hybrid Firmware)
Change log/ New features
- Added Voice Recognition in English & Cantonese. Launch the "Voice Commands" icon to view a list of supported voice commands.
- The voice command "Switch to Cantonese" will switch the voice recognition engine from English to Cantonese, without changing the system language settings or menus. This will be useful only to Cantonese speakers. If you accidentally use this voice command and can't speak Cantonese to switch it back to English. Click the "Cantonese" icon. The Cantonese icon acts as a toggle between English & Cantonese Voice Recognition.
- Mapped Voice Recognition key to lower right corner button. This key isn't customisation.
- Mapped the carrier key (lower left corner) to become the customisable key which can be customised under the setup menu.
- Added the Bar Code Scanner application (QRCode) to the firmware. To create your own QRCode, visit the URL http://qrcode.kaywa.com
- Removed Realplayer intro animation to speed up loading when lauching mediaplayer.
- Added telnet & samba daemons to the firmware. To enable them, choose USBNET under usb setup.
- Added auto power-on via alarm (originally by bint).
- Added busybox to the firmware and a list of linked commands, such as vi, cmp, gunzip, more, netstat, route, su, tail, etc.
5. Which Version of Firmware should I Use?
That is really up to you, Most people stay with a Generic firmware. But Lately the most popular firmware is ahman's hybrid firmware.
6. What is Flashing?
Flashing is the process by which you can change the version of firmware running on your phone. (Just like you can upgrade your Windows software). The process takes about 10 minutes. Generally you can flash from any version of firmware to any other – and then flash back again if desired.
Flashing to a different version of firmware should be fairly straightforward if you follow the directions carefully – but if you have any problems then there are many threads devoted to resolving flashing problems.
No harm will come to the phone from too much flashing, however, there is a small chance you could "brick" your phone if something goes seriously wrong - so the more you flash it, the more chances are that something might go wrong! Depending on your carrier you may also void the warranty! That said I have successfully flashed my phone 5 times now to try out different versions. IMPORTANT - before you begin flashing:
• Make sure your battery is fully charged before beginning a flash
• Back up your contacts and files using Motorola Phone Tools before doing any flashing as flashing will delete all of these and return your phone to a “vanilla” state. Data on your SD card is not touched.
• Give yourself plenty of time to complete the flashing. Never disconnect your phone or turn off your PC until the flashing is finished or you may make it unusable (i.e. "brick" it!!). There are ways to recover using a tool called radiocom (described in the threads) - but they are fairly complex.
7. How to Flash your Phone
All the files mentioned can be obtained from the Downloads section
Click here to download the following files.
1. Download the file MotPCSDrivers and unrar it threw Winrar Software & Motorola usb driver (win-32bit) v3.4.0 to your PC or to your desktop so you can easily find it.
2. Install a program called "RSDLite" on your PC. To Download RSD lite Click Download Box for the file. For trouble free installation, if you are running Windows XP, you should have Service Pack 2 installed.
3. Download the firmware file that you want to flash to and unrar it to your desktop.
4. Start up RSDLite on your PC. You may be asked to install a number of drivers (5 or 6) to your PC. Point it in the direction to the motpcsdrivers folder you unrared.
5. Put the phone in Bootloader Mode - MBM mode by turning on phone while also holding down the Camera Button and the On/off button (These need to be all be held down together). The phone should start up with a red screen and say its in MBM mode.
6. Plug phone in using usb cable.
7. RSDLite should list the phone (this may take a minute or so. If it does not close down RSDLite and restart it). Start the flash process, by clicking the button on the top with the ”…” and select the firmware file to install then click “Start”. The process will take several minutes so be patient, the screen on you phone will turn off, but RSDLite will still show progress.
8. When the "Found New Hardware" screen pops up, select “NO” for “Can Windows connect to Windows Update?” then select “Y” for “Install Software from a specific location” and point it to the motpcsdrivers folder you unrared. Once the driver has installed, click on “Finish” on the “Found New Hardware wizard” to continue the process.
9. You will need to install quite a few drivers – so just keep repeating. It may ask you to manually restart the phone – if so, unplug the cable from PC, remove the battery for 5 seconds (make sure unplugged first!), put battery back in then turn phone back on.
10. Once its fully on, go to Setup --> USB Mode and change mode from "Mass Storage" to "Modem".
11. Plug phone back into the PC using the cable. RSDLite should say "complete" or “PASS”
12. Unplug the phone again, turn it off and on. All should be complete.
You can now restore all your contacts, calendar and tasks back to your phone using MPT. (Be sure to remove the SIM card before doing this as the recovery function from MPT deletes any contact on SIM for some reason!)
8. What to Do if Problems
If you have any problems then don’t panic – the best thing is to close RSDLite, unplug the phone, take out the battery, replace then try again from the start.
1. If you get any of the following error messages that have been reported by users, then it appears most have been resolved by starting the flash process from the start:
- The "secure_motorola_flash" interface could not be found the super-file is secure and for re-flash, the phone needs a super-file that is not secure and for reflash. (0x7066)
- “flashing couldn't be complete because of licensed data”
- “error jumping to RAM downloader”
- a red line across their battery after flashing
2. Try a different USB port – a lot of users have stated that changing the USB port they have their phone plugged into helps, this is most likely because windows will reinstall all the drivers.
3. Try a different version of RSD Lite.
4. Make sure you put your phone in to USB MODEM MODE before plugging it back in. If you do not do this your system will not install all the devices correctly.
5. Try a different version of the firmware.
Problem: Phone can not read SIM card or has no signal after flashing
Some users experienced problems with the phone reading the SIM card or not getting a signal after flashing (ie it searches and finds nothing). If this happens to you then try the following:
1. Tap on status bar in home screen. Switch off antenna tap ok on the bottom. Then switch on antenna again. (You may need to repeat this a couple of times)
2. If that doesn't work, change the network band [dial pad-->menu button (at bottom left)-->setup--> network setup--> menu button--> search setup--> After that close all those things and you should have service again. Once you get your service back, repeat the steps and put it on automatic again.
_______________________________________________________
Originally Posted by Alpha43 on Motorolafans


